You passed the classroom portion, you know the legal standards, and you've handled the gun enough to feel comfortable. Then you step to the line for qualification, the timer starts, and rounds go everywhere except where they need to be. The course of fire isn't hard. The passing standard isn't unreasonable. But people fail it constantly, and they fail it for the same handful of reasons every single time.
May contain affiliate links.
This piece covers the most common qualification failures for armed security guards and the specific fixes for each one. Whether you're prepping for an initial armed qualification or an annual requalification, the problems and solutions are the same. Most of them don't require more ammo. They require better understanding of what's actually going wrong and a focused plan to fix it.
What the qual actually looks like
Before diagnosing failures, you need to understand what you're being tested on. The specifics change by state, but the structure is remarkably consistent across the country.
Most armed security qualification courses use a 50-round course of fire shot at distances ranging from close (3 to 7 yards) to moderate (15 to 25 yards). The passing score is typically 70 to 80 percent, depending on the state and the governing body. Oklahoma's CLEET standard, for example, requires a qualifying score of not less than 70 percent (72 points) on the duty handgun. Virginia's entry-level security officer handgun range qualification requires 100 rounds of ammunition for the session, with a minimum of 22 rounds of factory loaded ammunition fired for familiarization before the scored course begins. California's BSIS firearms training manual requires a two-hour refresher course prior to each range qualification course of fire, and the range qualification itself is a recurring requirement.
The common thread: you're shooting at relatively close distances, under mild time pressure, and you need to put roughly 7 or 8 out of every 10 rounds into a scored area. That's not a high bar for someone who trains. It is a surprisingly high bar for someone who doesn't.
Armed security requalification is typically annual. Arizona requires an annual eight-hour continuing firearms training requirement. California requires a two-hour review course and range qualification on a recurring schedule. The frequency means you can't just pass once and forget about it. You need to maintain a baseline, and that baseline has to hold up on a day when you might be nervous, rusty, or shooting a gun you haven't touched in months.
The five most common qualification failures
1. Anticipating recoil
This is the single biggest reason people fail qualification courses. It accounts for more missed shots than every other error combined. The shooter knows the gun is about to go bang, and their body reacts before the bullet leaves the barrel. The muzzle dips, the wrist tightens, the shoulders hunch. The round hits low, often low-left for right-handed shooters.

The frustrating part is that most shooters don't know they're doing it. As one training observation puts it, students will emphatically insist they're not flinching, but the evidence on target says otherwise. Some new shooters actually close their eyes while pressing the trigger and shove the gun away from their face. Most don't even realize they're doing it.
The diagnostic is simple: have someone else load your magazine with a mix of live rounds and dummy rounds (snap caps) in a random order. When you press the trigger on a dummy round and the gun doesn't fire, you'll see exactly what your hands are doing. If the muzzle dips on the dead round, you're anticipating. There's no arguing with it. The feedback is immediate and undeniable.
The fix starts with dry fire. Practice pressing the trigger on an unloaded gun with a focus on keeping the sights perfectly still through the entire trigger press. Balance a coin or a spent casing on the front sight and press the trigger without it falling. Do this for ten minutes a day for two weeks before your qualification date and you'll see a measurable difference. Dry fire allows practice of all the fundamentals without the distraction of recoil, and that's exactly what builds the habits that carry over to live fire.
On the range, slow down. Way down. Press the trigger so slowly that the shot surprises you. This is the compressed surprise break concept: you're pressing steadily, you know the shot is coming soon, but you don't know the exact instant. That fraction-of-a-second uncertainty keeps your body from flinching before the shot breaks.
2. Poor trigger control
Trigger control problems show up as inconsistent groups. You'll put three rounds in a tight cluster, then throw one wide, then come back. The group looks like a shotgun pattern instead of a pistol group. The cause is almost always finger placement or trigger press mechanics.

Where your finger contacts the trigger matters. Too much finger (the trigger sitting in the crease of the first joint) tends to pull shots toward the strong hand side. Too little finger (just the tip) tends to push shots the opposite direction. The pad of the fingertip, roughly centered on the first pad between the tip and the first joint, is the standard starting point. But what matters most is consistency. The same placement every time.
The press itself needs to be straight back. Any lateral pressure on the trigger face will move the muzzle. A common error called "milking" happens when the shooter squeezes all four fingers simultaneously as they press the trigger, which torques the grip and moves the sights off target. Another error is jerking, which is a sudden yank on the trigger instead of a steady increase in pressure. Both create unnecessary movement in the barrel during the firing process.
The fix: dry fire with a focus on the front sight. Set up on a blank wall at home with an unloaded, verified-clear gun. Pick a small spot on the wall. Press the trigger while watching the front sight. Did it move? If yes, your trigger press is introducing movement. Repeat until you can press the trigger with zero visible sight movement. Then do it again faster. Then faster. Speed comes from smoothness, and smoothness comes from repetition.
3. Grip problems
A weak or inconsistent grip amplifies every other error. Recoil moves the gun more than it should, follow-up shots take longer to get back on target, and the shooter's confidence drops with every round. Grip issues are especially common with shooters who only pick up their qualification gun a few days before the test.

Gripping the gun wrong affects both accuracy and the ability to manage recoil for follow-up shots. Managing grip pressure during the recoil process is vital. Too little grip pressure lets the gun shift in the hand. Too much grip pressure, particularly in the wrong places, creates tension that fights the trigger press.
The standard two-handed grip puts roughly 60 percent of the grip pressure in the support hand. The support hand wraps around the fingers of the firing hand, filling as much of the exposed grip surface as possible. The firing hand grips firmly but not so tightly that the trigger finger can't move independently.
Here's what to check: after firing a string, look at where the gun ended up in your hand. Did it shift? Is the web of your hand still high on the backstrap? Are your thumbs still where they started? If the gun is migrating during a string of fire, your grip isn't locked in.
Dry fire fixes this too. Practice presenting the gun from the holster and establishing your grip before the gun reaches full extension. The grip should be set by the time the gun clears the holster, not adjusted after you're on target. Every draw is a grip check.
4. Sight alignment and sight picture failures
At 7 yards, you can get away with a lot. At 15 or 25 yards, even small alignment errors put rounds outside the scored area. The qualification course of fire typically includes stages at longer distances specifically to test this fundamental.

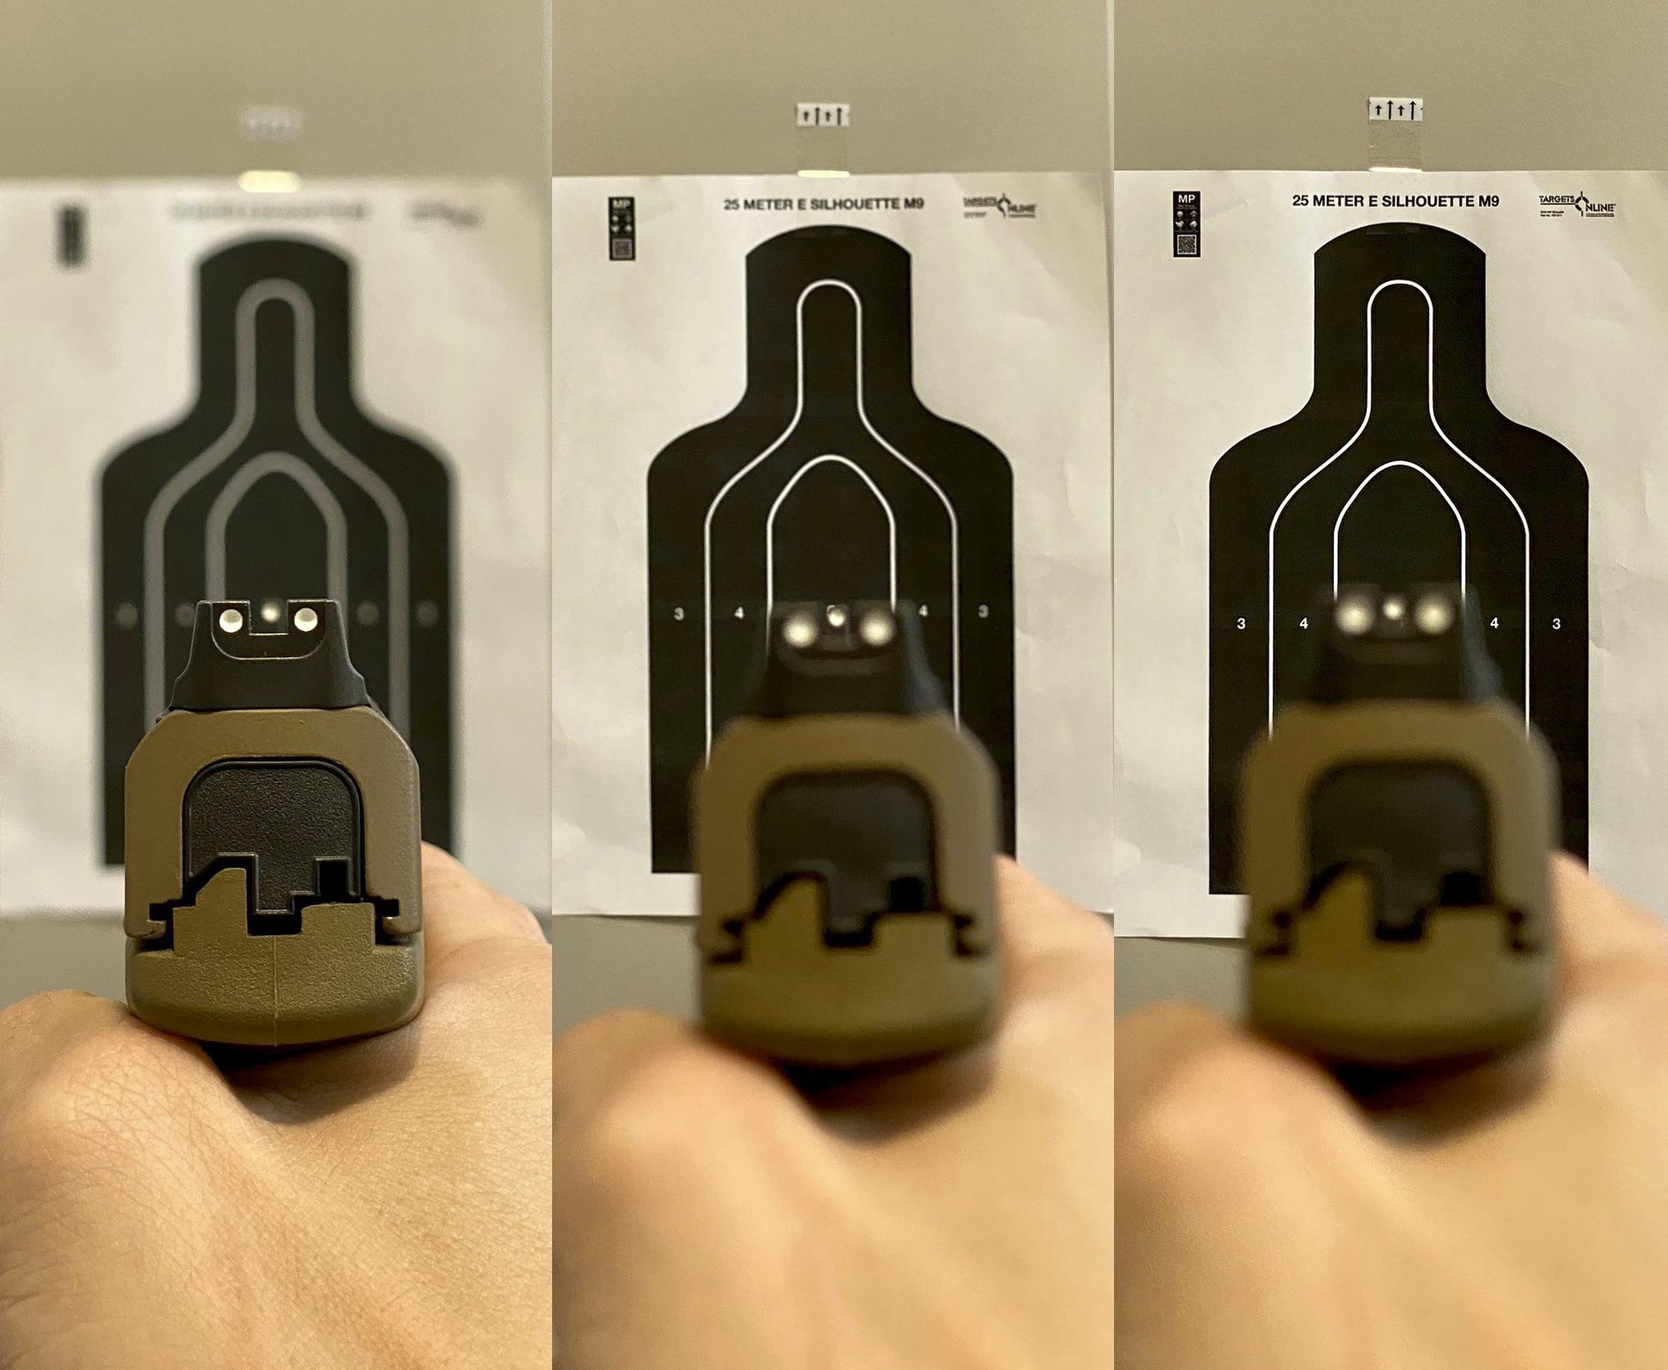
Sight alignment means the front sight is centered in the rear notch, with equal light on both sides and the top of the front sight level with the top of the rear sight. Sight picture means that aligned sight picture is placed correctly on the target. Both have to be right for the shot to land where you want it.
The most common failure here is target focus instead of front sight focus. Shooters look at the target (where they want the bullet to go) instead of the front sight (which actually tells them where the bullet will go). At qualification distances, the target should be slightly blurry and the front sight should be sharp. This is counterintuitive, and it takes deliberate practice to override the natural tendency to look at what you're trying to hit.
At longer stages of the qualification course, sight alignment errors that were invisible at 7 yards become 4- to 6-inch misses. A front sight that's just slightly off-center in the rear notch will throw the round wide enough to miss the scored zone entirely.
The fix: shoot a group at 15 or 25 yards with no time pressure. Just accuracy. If the group is centered but large, your sight alignment is inconsistent. If the group is tight but off to one side or high/low, your sight picture is off but your mechanics are actually decent. That distinction matters because the remediation is different.
For inconsistent alignment, slow down and verify the sight picture before every shot. For a consistent offset, adjust your point of aim or check that your grip isn't canting the gun.
5. Time pressure panic
Qualification courses include timed stages. The timer beeps, you have a set number of seconds to fire a set number of rounds. For shooters who are already shaky on fundamentals, the time pressure turns manageable errors into complete misses.
Here's the thing most people get wrong about timed stages: the par times on security qualification courses are generous. They're not competition par times. They're designed so that a shooter with basic competence can complete the string with time to spare. If you're rushing, you're probably faster than you need to be and less accurate than you need to be.
The fix is knowing the course of fire before you show up. If your state or training provider publishes the qualification course, study it. Know how many rounds you fire at each distance, know the time limits, and practice those specific strings. Familiarity reduces panic. When the timer beeps and you already know you have plenty of time for four rounds at 7 yards, you don't rush.
Run the course of fire in dry practice at home. Set a timer on your phone. Practice the draw, the presentation, and the trigger press for each stage. You can't simulate recoil, but you can simulate the timing and the transitions. Showing up to qualification having already "run" the course twenty times in dry fire is a massive advantage.
Common mistakes beyond the shooting
Not shooting your actual duty gun
Some shooters practice with one gun and qualify with another. Different trigger, different sights, different grip angle, different recoil impulse. Everything you trained transfers imperfectly at best. If you're going to qualify with a specific firearm, train with that firearm. Virginia's qualification standard specifically requires equipment including the handgun, belt with directional draw holster worn on the same side as the shooting hand, two speed loaders or three magazines, and 100 rounds of ammunition. Show up with the gear you'll actually use.
Skipping the refresher requirement
California requires completion of a two-hour refresher course prior to each range qualification. This isn't optional paperwork. If your state mandates pre-qualification instruction, treat it as part of your preparation, not an obstacle to get through. The refresher exists because people forget things between annual qualifications. Use it.
Not knowing the passing standard
Seventy percent sounds easy until you realize that on a 50-round course, that means you can only drop 15 rounds outside the scored area. Miss one stage badly and you're already fighting to make up points. Know exactly how many points you need and how many you can afford to drop. That math changes how you approach each stage.
Neglecting equipment
Magazines that don't seat properly, a holster that doesn't fit the duty belt, ammunition you've never fired before. Any of these can cause problems on qualification day. Function-check your magazines. Make sure your holster retention is set where you want it. Shoot at least a box of your qualification ammunition before the test to confirm it feeds and functions in your gun.
Treating qualification as training
This is the biggest mindset error. Qualification is a test, not a training session. The time to learn and fix problems is before you get to the qualification line. Showing up hoping to "figure it out" during the scored course is a recipe for failure. The training happens in the weeks before. The qualification just confirms the training worked.
A four-week prep plan
This doesn't require thousands of rounds or expensive classes. It requires consistency and a plan.
Weeks one and two: dry fire foundation
Ten minutes a day, five days a week. Work the draw from your duty holster to a full presentation. Focus on grip establishment, sight alignment, and trigger press. Use a shot timer app on your phone to track your draw-to-first-press time. Start slow. A clean, smooth draw with a perfect trigger press at 3 seconds is better than a sloppy draw at 1.5 seconds.
Run the ball-and-dummy drill concept in dry fire by simply verifying that your sights don't move when the trigger breaks. If you see the front sight dip, you're anticipating. Slow down and press smoother.
Week three: live fire diagnostic
One range session, 50 rounds. That's it. Shoot them with a plan.

BC-27 silhouette qualification target Deals
Prices may change. May contain affiliate links.
Start at 7 yards. Fire 10 rounds slow-fire, one shot at a time, with a focus on sight alignment and trigger press. No time pressure. Assess the group. Where are the rounds hitting? Are they clustered or scattered?

Move to 15 yards. Fire 10 rounds the same way. The group will open up. That's normal. But look at where it opens. Low and left means anticipation. Scattered means trigger control. Consistently off to one side means sight alignment or grip.
Now run 30 rounds through your actual qualification course of fire if you know it. Use a timer. Score it honestly. This is your baseline. Write down the score.
Fifty rounds with a plan beats 200 without one.
Week four: targeted fixes and a second live session
Based on your week-three diagnostic, spend the first half of the week on dry fire that targets your specific weakness. If you're anticipating, do ten minutes of wall drill every day (dry fire at a blank wall, watching for sight movement). If your trigger control is inconsistent, do slow-press drills until the sight doesn't move at all.
Then hit the range one more time. Another 50 rounds. Run the qualification course of fire again. Compare to your week-three score. Track the trend.
If you scored 70 percent in week three and 80 percent in week four, you're heading in the right direction. If you're still at 70 percent, identify which stage is costing you the most points and focus dry fire on that specific distance and string.
Range notes
The ball-and-dummy drill is the single most valuable diagnostic tool for qualification prep. Load a magazine with a random mix of live rounds and snap caps (or have a training partner load it for you so you don't know the order). Fire normally. When the hammer drops on a dead round, you'll see exactly what your body is doing. If the muzzle stays still, you're pressing clean. If it dips, you have work to do. This drill doesn't lie, and it cuts through every excuse.

For right-handed shooters hitting low-left, the cause is almost always a combination of anticipation and trigger finger pressure pulling the muzzle down and to the left. For left-handed shooters, the same errors produce low-right impacts. The correction is the same either way: smoother trigger press, better grip pressure management, and eliminating the flinch.
What "good enough" looks like, and what comes after
Passing the qualification is the minimum standard. It means you can put rounds on paper at close to moderate distances under mild time pressure. That's the floor, not the ceiling.
If you're consistently scoring 90 percent or above on your qualification course, you've got the fundamentals locked in for that specific test. The next step is to push beyond the qual parameters. Shoot at longer distances. Use smaller targets. Tighten the par times. Add movement, reloads, or malfunction clearance drills. The qualification course tests whether you can hit a target. Real defensive competence requires a lot more than that.
Track your scores over time. Write down the date, the course of fire, the score, and any notes about what went wrong. A simple notebook works. When you can look back over six months of data and see a clear upward trend, you know your training is working. When the trend flattens, it's time to change something: a new drill, a different focus area, or outside instruction from a qualified firearms instructor.
The armed security qualification isn't the end of your training. It's a recurring checkpoint. Treat it that way, prep for it deliberately, and the pass takes care of itself. Then get back to the real work.