You've got three sighting methods, strong opinions about all of them, and probably zero data from your own shooting to back any of it up. That's the problem. Everybody argues about point shooting versus red dots versus iron sights like it's a religion, but almost nobody runs a standardized drill across all three methods and actually records the results.
This drill fixes that. It gives you a repeatable course of fire you can run with the same pistol (or matched pistols) across three aiming methods: unsighted point shooting, iron sights, and a slide-mounted red dot. You'll walk away with cold, honest numbers on your draw-to-first-shot speed, your split times, your hit rates, and your transition speeds for each method. No guessing. No forum debates. Just your timer and your targets telling you exactly where you stand.

9mm ammunition Deals
Prices may change. May contain affiliate links.
The goal isn't to crown a winner. The goal is to find out where each method works for you, at what distances each one breaks down, and what you actually need to train.
Goal of the drill
This drill tests three specific skills across all three sighting methods: draw-to-first-shot speed, practical accuracy at close and moderate distances, and target-to-target transition time. You're measuring how fast you can get a hit, how accurate that hit is, and how quickly you can move between targets.
Point shooting emphasizes speed and instinct at close range. The technique has been used and discussed since the early 19th century, though it was notably advocated by William Fairbairn and Rex Applegate in the early 20th century, and it's still taught in various forms by military and law enforcement agencies worldwide. The core idea is simple: at very close distances, in life-threatening situations that develop fast, bringing the gun to eye level and aligning sights costs time you may not have. Advocates argue that inside roughly 1 to 7 yards, a practiced shooter can deliver accurate fire by indexing the gun toward the target without using sights at all.
Iron sights demand alignment of three focal planes: rear sight, front sight, and target. Your eye can only sharply focus on one at a time, so you're trained to prioritize the front sight and let the rear and the target blur slightly. It's a skill that takes real repetition, but once it's solid, it's fast and it never needs a battery.

May contain affiliate links.
A red dot collapses those three points of alignment down to one: the dot sits on the same plane as the target, eliminating the need to change focal planes. You stay target-focused, superimpose the dot, and press. Both eyes open, full peripheral awareness. The fastest competitive pistol divisions are red dot divisions, and there's a reason those shooters don't compete head-to-head against iron sight shooters. But a red dot also introduces variables iron sights don't have: batteries, glass that can fog or get obscured by lint and debris, and a learning curve around dot acquisition during the draw that trips up a lot of shooters for longer than they expect.

This drill puts all three methods on equal footing and lets the timer and the target sort it out.
Safety and equipment checklist
You need a few things to run this cleanly.
Gear
Start with a pistol you're comfortable shooting. Ideally, you want the same gun for all three methods. If you're running a slide-cut pistol with a red dot and co-witness irons, you can remove the optic for the iron sight strings and then run unsighted for point shooting. If swapping isn't practical, two matched pistols work. One source tested this comparison using two nearly identical Tanfoglio pistols, one with irons and one with a frame-mounted red dot, to keep the handling as close as possible. The key is minimizing variables that aren't related to the sighting method.
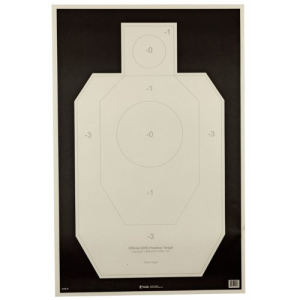
IDPA silhouette target Deals
Prices may change. May contain affiliate links.

May contain affiliate links.
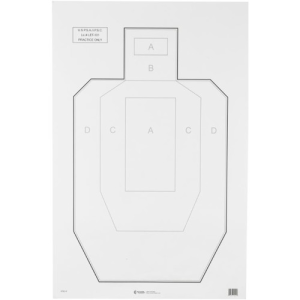
You'll need a shot timer. No timer, no data, no point. You'll also need three IDPA or USPSA metric targets, or equivalent silhouettes with a clearly defined 8-inch center circle (the torso zone) and a 4-inch head circle. If your range doesn't stock those, a simple 8-inch paper plate stapled to a silhouette works for the torso standard. Bring a stapler, a marker, and a notebook or your phone for logging.

Round count for the full drill is approximately 90 rounds, broken into 30 per sighting method. Bring 120 to give yourself margin for re-runs on any string you botch procedurally.
Safety notes
Point shooting strings are fired from the holster at close range. Muzzle discipline matters more than usual because you're not bringing the gun up to your normal sight line. If your range doesn't allow drawing from a holster, you can start from a low ready position, but note that in your log because it changes your draw-to-first-shot baseline. Clear the gun completely between method transitions if you're swapping optics or slides. Run every string cold when possible, meaning no warm-up strings before you record.
Course of fire
The drill has three stages, each run at a different distance. You shoot all three stages with one sighting method before switching to the next. This keeps you in one mode long enough to settle in but still reveals distance-dependent differences.
Stage 1: close range, 5 yards
Draw and fire one shot to the 8-inch torso circle. Repeat for five reps, recording each draw-to-shot time. This is where point shooting should theoretically shine. Testing by competitive shooters has shown that at 5 meters (roughly 5.5 yards), iron sights can actually keep up with or edge out a red dot on draw-to-first-shot time, with one IPSC Junior World Champion recording a first iron sight attempt of 0.75 seconds (a Charlie hit) and a 0.69-second Alpha hit on the third attempt, compared to a first red dot shot of 0.78 seconds at that distance. Point shooting at this range should be even faster if your index is solid, but the question is whether your hits hold up.
Stage 2: moderate range, 10 yards
Draw and fire two shots to the 8-inch torso circle. Five reps, recording draw-to-first-shot and the split between shots one and two. This is the distance where the sighting methods start to separate. Point shooting accuracy typically degrades here, while red dots and irons should both deliver clean hits if your fundamentals are there.
Stage 3: extended range, 15 yards
Draw and fire two shots to the 8-inch torso circle, then transition to a second target (set 5 feet to the side) and fire two shots. Three reps, recording total time and noting hits per target. This stage tests both accuracy at distance and transition speed. One formal test using this approximate format found that at 15 yards, iron sight shooters averaged 3.91 seconds total across six shots on multiple targets, while red dot shooters averaged 4.80 seconds. Iron sight split times averaged 0.46 seconds versus 0.61 for the red dot, and target transition times averaged 0.60 seconds for irons versus 0.74 for the dot. That might surprise you. It surprised the testers too.
Execution steps
Running point shooting strings
For point shooting, the gun comes out of the holster and punches toward the target without rising to your normal sight line. You're indexing the muzzle using your grip, your body mechanics, and your proprioceptive sense of where the gun is pointed. Think of it as making the gun an extension of your index finger. Both eyes stay wide open and locked on the target.
The coaching cue: drive the gun straight toward the center of the target as if you're punching it. Don't look at the gun. Don't try to peek at the sights. Commit fully to the method. If you cheat and glance at your front sight, you're not testing point shooting anymore.
At 5 yards, focus on a specific spot on the target, not the target generally. Pick the center of the 8-inch circle. At 10 and 15 yards, you'll feel the urge to bring the gun up higher and sneak a look at the sights. Resist it. The whole point is finding out where this method fails for you at your current skill level.
Running iron sight strings
Standard presentation. Draw, drive the gun up to your sight line, pick up the front sight as early as possible during the press-out, confirm sight picture, and press. The coaching cue here is front sight focus. If you're target-focused during the press, you're not running irons correctly and your data won't mean anything.
On the two-shot strings, focus on calling your shots. Where was the front sight when the trigger broke? If you can't answer that for each round, slow down until you can. Speed comes from fundamentals, not from rushing.
Running red dot strings
Draw and present the same way you would with irons. This is critical. The SIG Pistol Mounted Optics instructor curriculum specifically addresses this: if you can't present the weapon with iron sights aligned, you can't engage quickly with the dot you're searching for. A good dot presentation is built on top of a good iron sight presentation. The gun comes up, your eyes stay on the target, and the dot appears in the window because your index is correct.
May contain affiliate links.
The coaching cue: stay target-focused. Don't hunt for the dot. If the dot isn't there when the gun arrives, your presentation needs work, and that's diagnostic information worth having. A red dot replaces the three-point alignment of irons with a single focal point on the target, reducing visual processing and speeding acquisition, but only if your draw and index put the dot in the window consistently.
On transitions at 15 yards, push the gun toward the next target and let the dot settle rather than chasing it. The dot will tell you things about your recoil management and grip that irons hide. That's one of its biggest training advantages.

Standards and scoring
Hit criteria
Any shot inside the 8-inch torso circle counts as a hit. Any shot outside it is a miss. No partial credit. You're testing practical accuracy under speed, not group size.
Par times
These are starting benchmarks. Adjust based on your experience level (see scaling section below).
Stage 1 (5 yards, single shot from draw): par time of 1.5 seconds. The standard for a clean draw to first shot on an 8-inch circle at 5 yards. Competitive shooters will be well under this. If you're over 2.0 seconds consistently, your draw needs dedicated dry fire work before this drill will give you useful data.
Stage 2 (10 yards, two shots from draw): par time of 2.5 seconds. This gives you roughly 1.5 seconds for the draw and first shot, plus a one-second split for the follow-up.
Stage 3 (15 yards, four shots on two targets from draw): par time of 5.0 seconds. This matches roughly with the iron sight averages from formal testing at this distance.
Scoring method
Record three numbers for each string: total time, number of hits, and number of misses. Calculate a hit percentage for each sighting method at each distance. Then compare your average times across methods at each stage.
The real diagnostic isn't which method is "best." It's the crossover point. At what distance does point shooting stop producing acceptable hits? At what distance does the red dot start outperforming irons? Where are your transitions faster and why? Those answers are personal to your skill level and your specific equipment.
Common mistakes
Five things that wreck the data or the training value of this drill.
Peeking at sights during point shooting strings. If you sneak a glance at the front sight, you're running a hybrid method, not point shooting. Commit to the method for the test. You can blend techniques in real life, but the drill needs clean data.
Hunting for the dot. Shooters who are relatively new to red dots will spend time fishing around in the window trying to find the dot after the draw. This inflates their times and makes the red dot look worse than it is for an experienced dot shooter. If your dot acquisition is inconsistent, that's a training problem worth identifying, but be honest in your log about whether a slow time was a presentation issue or an aiming issue.
Changing grip pressure between methods. Some shooters unconsciously grip harder during point shooting because they're less confident. Others relax too much with a red dot because they trust the optic. Keep your grip consistent. It's a variable you don't want contaminating your data.
Not recording misses. A 1.2-second draw means nothing if the round hit the berm. Every miss gets logged. A fast miss is worse than a slow hit for this drill's purposes.
Running the drill hot instead of cold. Your first rep of the day is the most honest rep. If you warm up with 50 rounds of freestyle shooting and then run the drill, you're testing your warmed-up performance, not your actual baseline. Run it cold. First rounds out of the case.
Scaling up and down
For newer shooters
Increase all par times by 50 percent. Move Stage 3 in to 10 yards and use a single target (no transitions) until your hit percentage at that distance is above 80 percent with all three methods. Skip point shooting beyond 5 yards entirely until your iron sight fundamentals are solid. Multiple experienced instructors and competitive shooters recommend building a disciplined draw stroke and front sight presentation with irons first because that foundation transfers directly to both red dot shooting and point shooting. The presentation is the skill.
For experienced shooters
Tighten the hit zone to a 6-inch circle or use the 4-inch head box as your scoring zone. Cut par times by 20 percent. Add a Stage 4 at 25 yards: draw and fire five shots on the 8-inch circle, no time limit, just recording group size and hit percentage. This is where the red dot's advantage at distance should become obvious, and where point shooting will almost certainly fall apart. You can also add a low-light component if your range allows it. Red dots with adjustable illumination maintain visibility in low light, while iron sights require tritium or fiber optic inserts to remain usable, and point shooting becomes entirely index-dependent.
Dry fire scaling
Every stage of this drill can and should be practiced in dry fire first. Use your shot timer's par time function and practice the draw to presentation. For point shooting dry fire, set up a target on the wall and practice driving the muzzle to center without looking at the sights. For red dot dry fire, practice the draw and confirm that the dot appears in the window on every rep. If it doesn't, your grip or your wrist angle during presentation needs adjustment. Dry fire fixes this faster than live fire does because you can get 50 reps in ten minutes with zero ammo cost.
LaserLyte LT-TTL blue training pistol
May contain affiliate links.

Tracking progress
Use a simple log. Date, method, stage, time, hits, misses. That's it. Don't overcomplicate it.
What "good" looks like
At 5 yards, all three methods should produce 90 percent or better hit rates on the 8-inch circle. If point shooting drops below 80 percent here, your index needs work. If your red dot times are slower than your iron sight times at this distance, that's normal and consistent with testing data. Don't panic about it.
At 10 yards, point shooting hit rates will likely drop to 60 to 70 percent for most shooters. Irons and red dots should both stay above 85 percent. If your red dot times are still slower than irons at 10 yards, you may need more reps on dot acquisition from the draw.
At 15 yards, the red dot should start pulling ahead on accuracy, even if transition times are slightly slower. One formal test found that red dot shooters could make more accurate shots at any distance, but iron sight shooters were faster on transitions and splits at 15 yards. The accuracy advantage of the dot grows with distance while the speed advantage of irons shrinks.
Progression
Run this drill once a month as a cold diagnostic. Don't train it every range session or you'll start optimizing for the drill instead of building transferable skills. Between tests, train your weakest method. If your point shooting falls apart at 10 yards, dedicate dry fire reps to your index. If your dot acquisition is slow, dry fire your draw-to-dot presentation 20 times before every range session. If your iron sight splits are slow, work your grip and trigger reset in dry fire.
Track your times and hit percentages on a simple chart or spreadsheet. After three months, you'll have a trend line for each method at each distance. That trend line is worth more than any internet argument about which sighting system is "best." It's your data, from your gun, with your skills. Trust the trend, keep training the gaps, and let the timer be the coach.
Fifty rounds with a plan beats 200 without one. This drill is the plan.