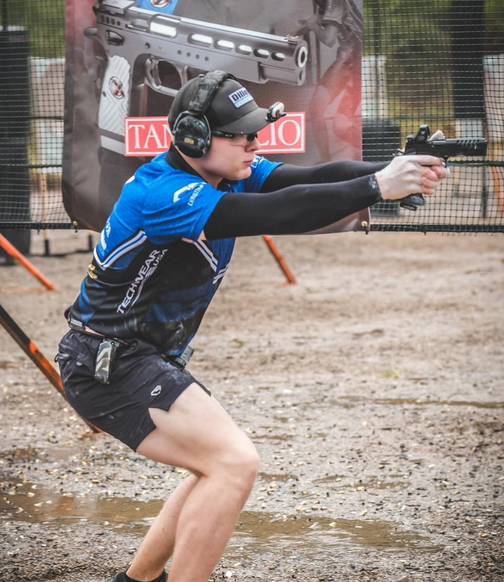
You just shot your first USPSA match with whatever holster and mag pouches you had lying around. Maybe you borrowed gear, maybe you cobbled something together from your range bag. Either way, you spent more time fighting your equipment than the targets, and now you're ready to get serious about a proper competition belt.
Here's the thing: Production Division has specific gear rules that'll shape every choice you make. No race holsters, no fancy mag wells, no compensators. Your belt setup becomes the foundation for everything else, and getting it wrong means fighting uphill battles at every match.
The short version: we're talking about the complete belt system—the belt itself, holster, mag pouches, and how to position everything so you can actually shoot fast without your gear getting in the way.
Why Production Division belts are different
Production rules force you into a specific box. Your holster can't ride below the bottom of your belt. Magazine pouches have to be behind your hip bone. You're limited to five magazines total, including the one in your gun. These aren't arbitrary restrictions—they're designed to keep Production gear closer to what you might actually carry.
The result is a more compact setup than Open or Limited divisions. You can't spread everything around your waist like you're wearing a tool belt. Everything has to work in a smaller footprint, which means positioning becomes critical.
Most guys coming from casual shooting underestimate how much the belt affects their draw stroke. A flimsy belt that sags under the weight of loaded mags will change your grip angle. A belt that's too loose will shift during movement. Too tight, and you'll be uncomfortable after the first stage.
The other reality: Production Division moves fast. You're not making precision shots at tiny targets—you're putting acceptable hits on larger zones as quickly as possible. Your belt setup needs to support speed, not precision. Every extra tenth of a second you spend fumbling for a magazine matters.
Belt construction and sizing
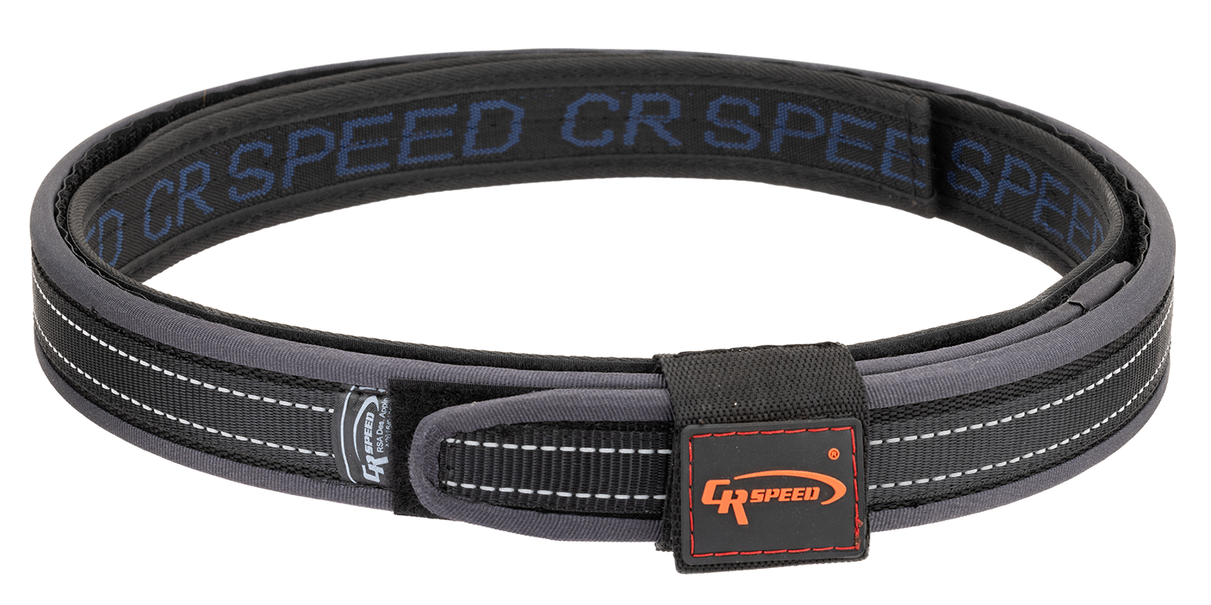
Competition belts fall into three main categories: traditional leather with stiffener, synthetic race belts, and ratchet systems. Each has trade-offs that matter in Production.
Leather belts with internal stiffeners offer the most adjustability. Companies like CR Speed build these with a rigid core wrapped in leather. They conform to your body over time but maintain enough stiffness to support gear without sagging. The downside is break-in time and weight—they're noticeably heavier than synthetic options.
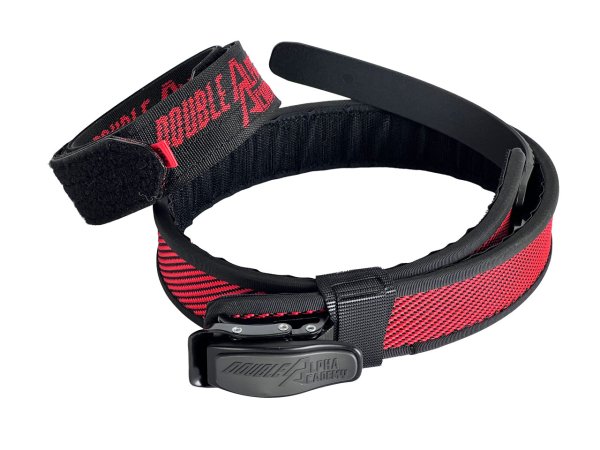
Synthetic race belts like the Double Alpha Academy models use rigid polymer or carbon fiber construction. They're lighter and don't require break-in, but they're less forgiving if you get the sizing wrong. The upside is consistent positioning—they don't stretch or conform, so your gear stays exactly where you put it.
Ratchet belts split the difference. The DAA Ratchet Belt uses a traditional buckle system but with micro-adjustments. You get the precise fit of a race belt with more flexibility for different clothing or seasonal weight changes.
Fit & Feel
Getting belt size right is trickier than it sounds. Most guys order based on their pants size and end up with something too small. Competition belts sit higher on your waist than a casual belt, usually right at your natural waistline. Measure there, not at your hips.
Add 4-6 inches to that measurement for your belt size. You want the buckle to land roughly centered on your stomach, not off to one side. Too small, and you'll be using the last holes with no room for adjustment. Too large, and you'll have excess belt flapping around.
The belt should feel snug but not restrictive. You'll be bending, kneeling, and moving aggressively. If it's tight enough to affect your breathing, it's too tight.
Width matters more in Production than other divisions. A 1.5-inch belt offers the best compromise between stiffness and comfort. Wider belts distribute weight better but can interfere with your draw if your holster sits high. Narrower belts are more comfortable but may not support heavy magazine loads without sagging.
Holster selection and positioning
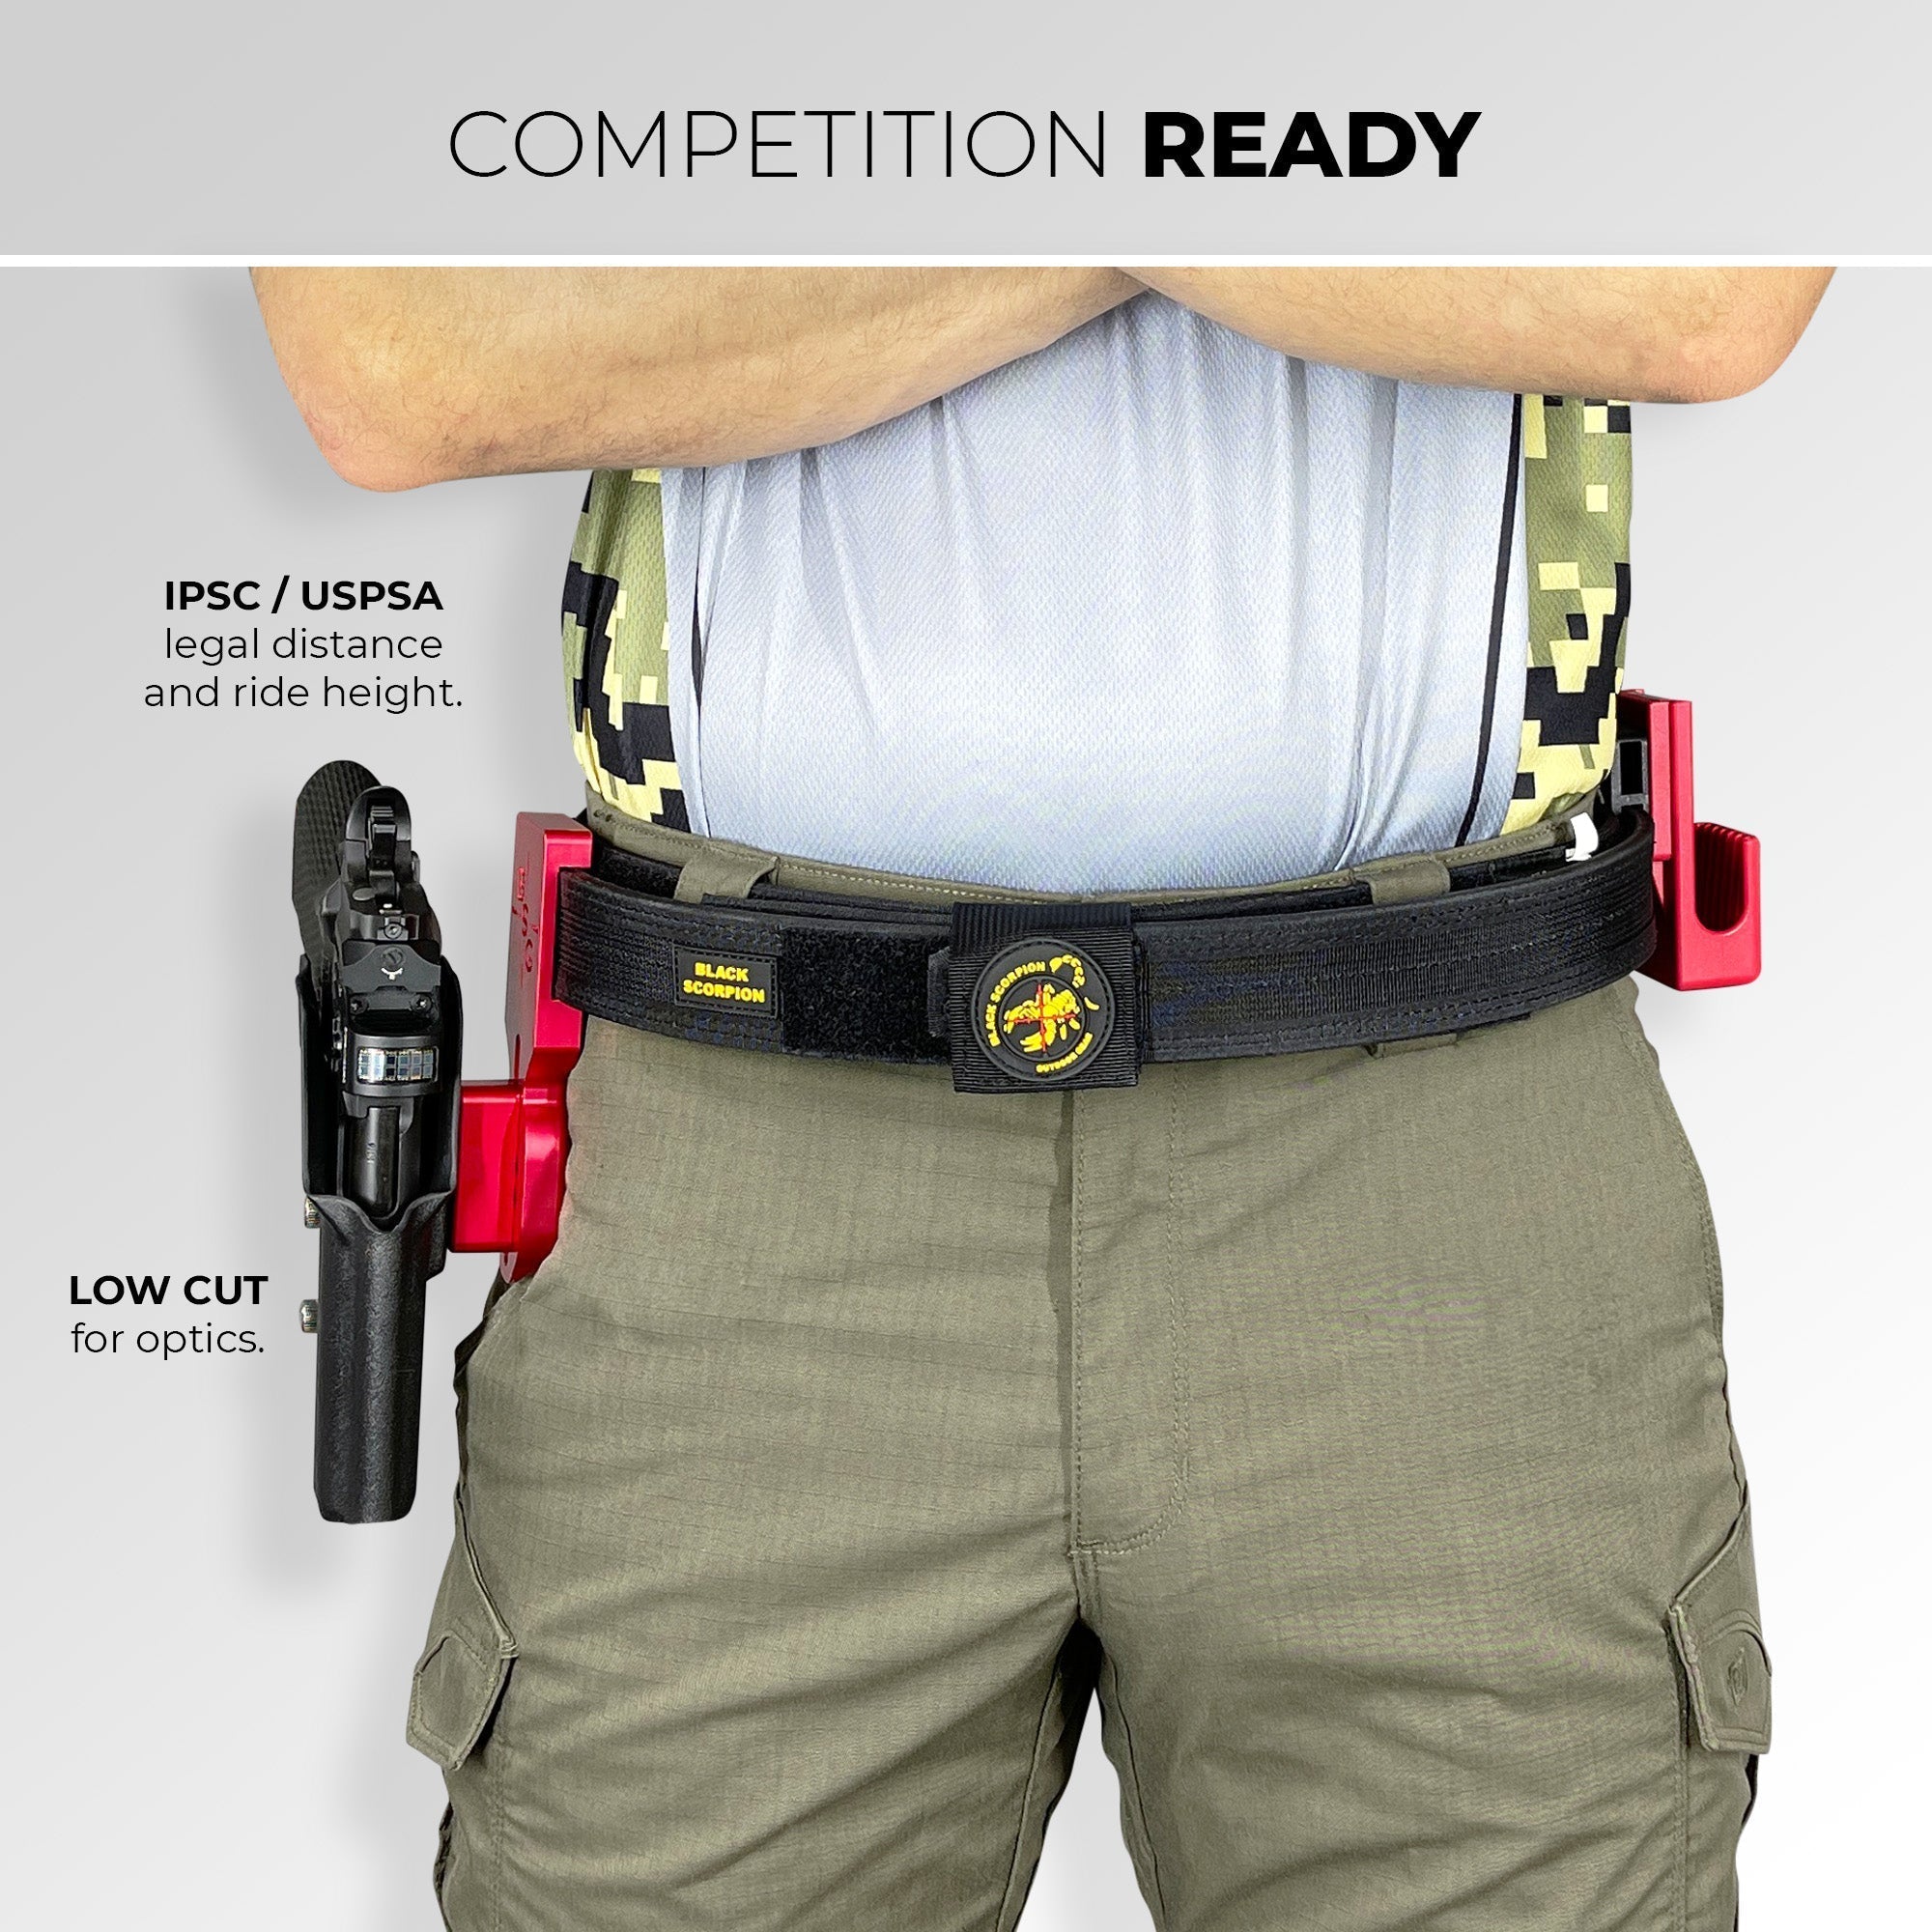
Production holster rules are straightforward: outside the waistband, no race features, and the bottom of the holster can't extend below the bottom of your belt. Within those constraints, you still have meaningful choices.
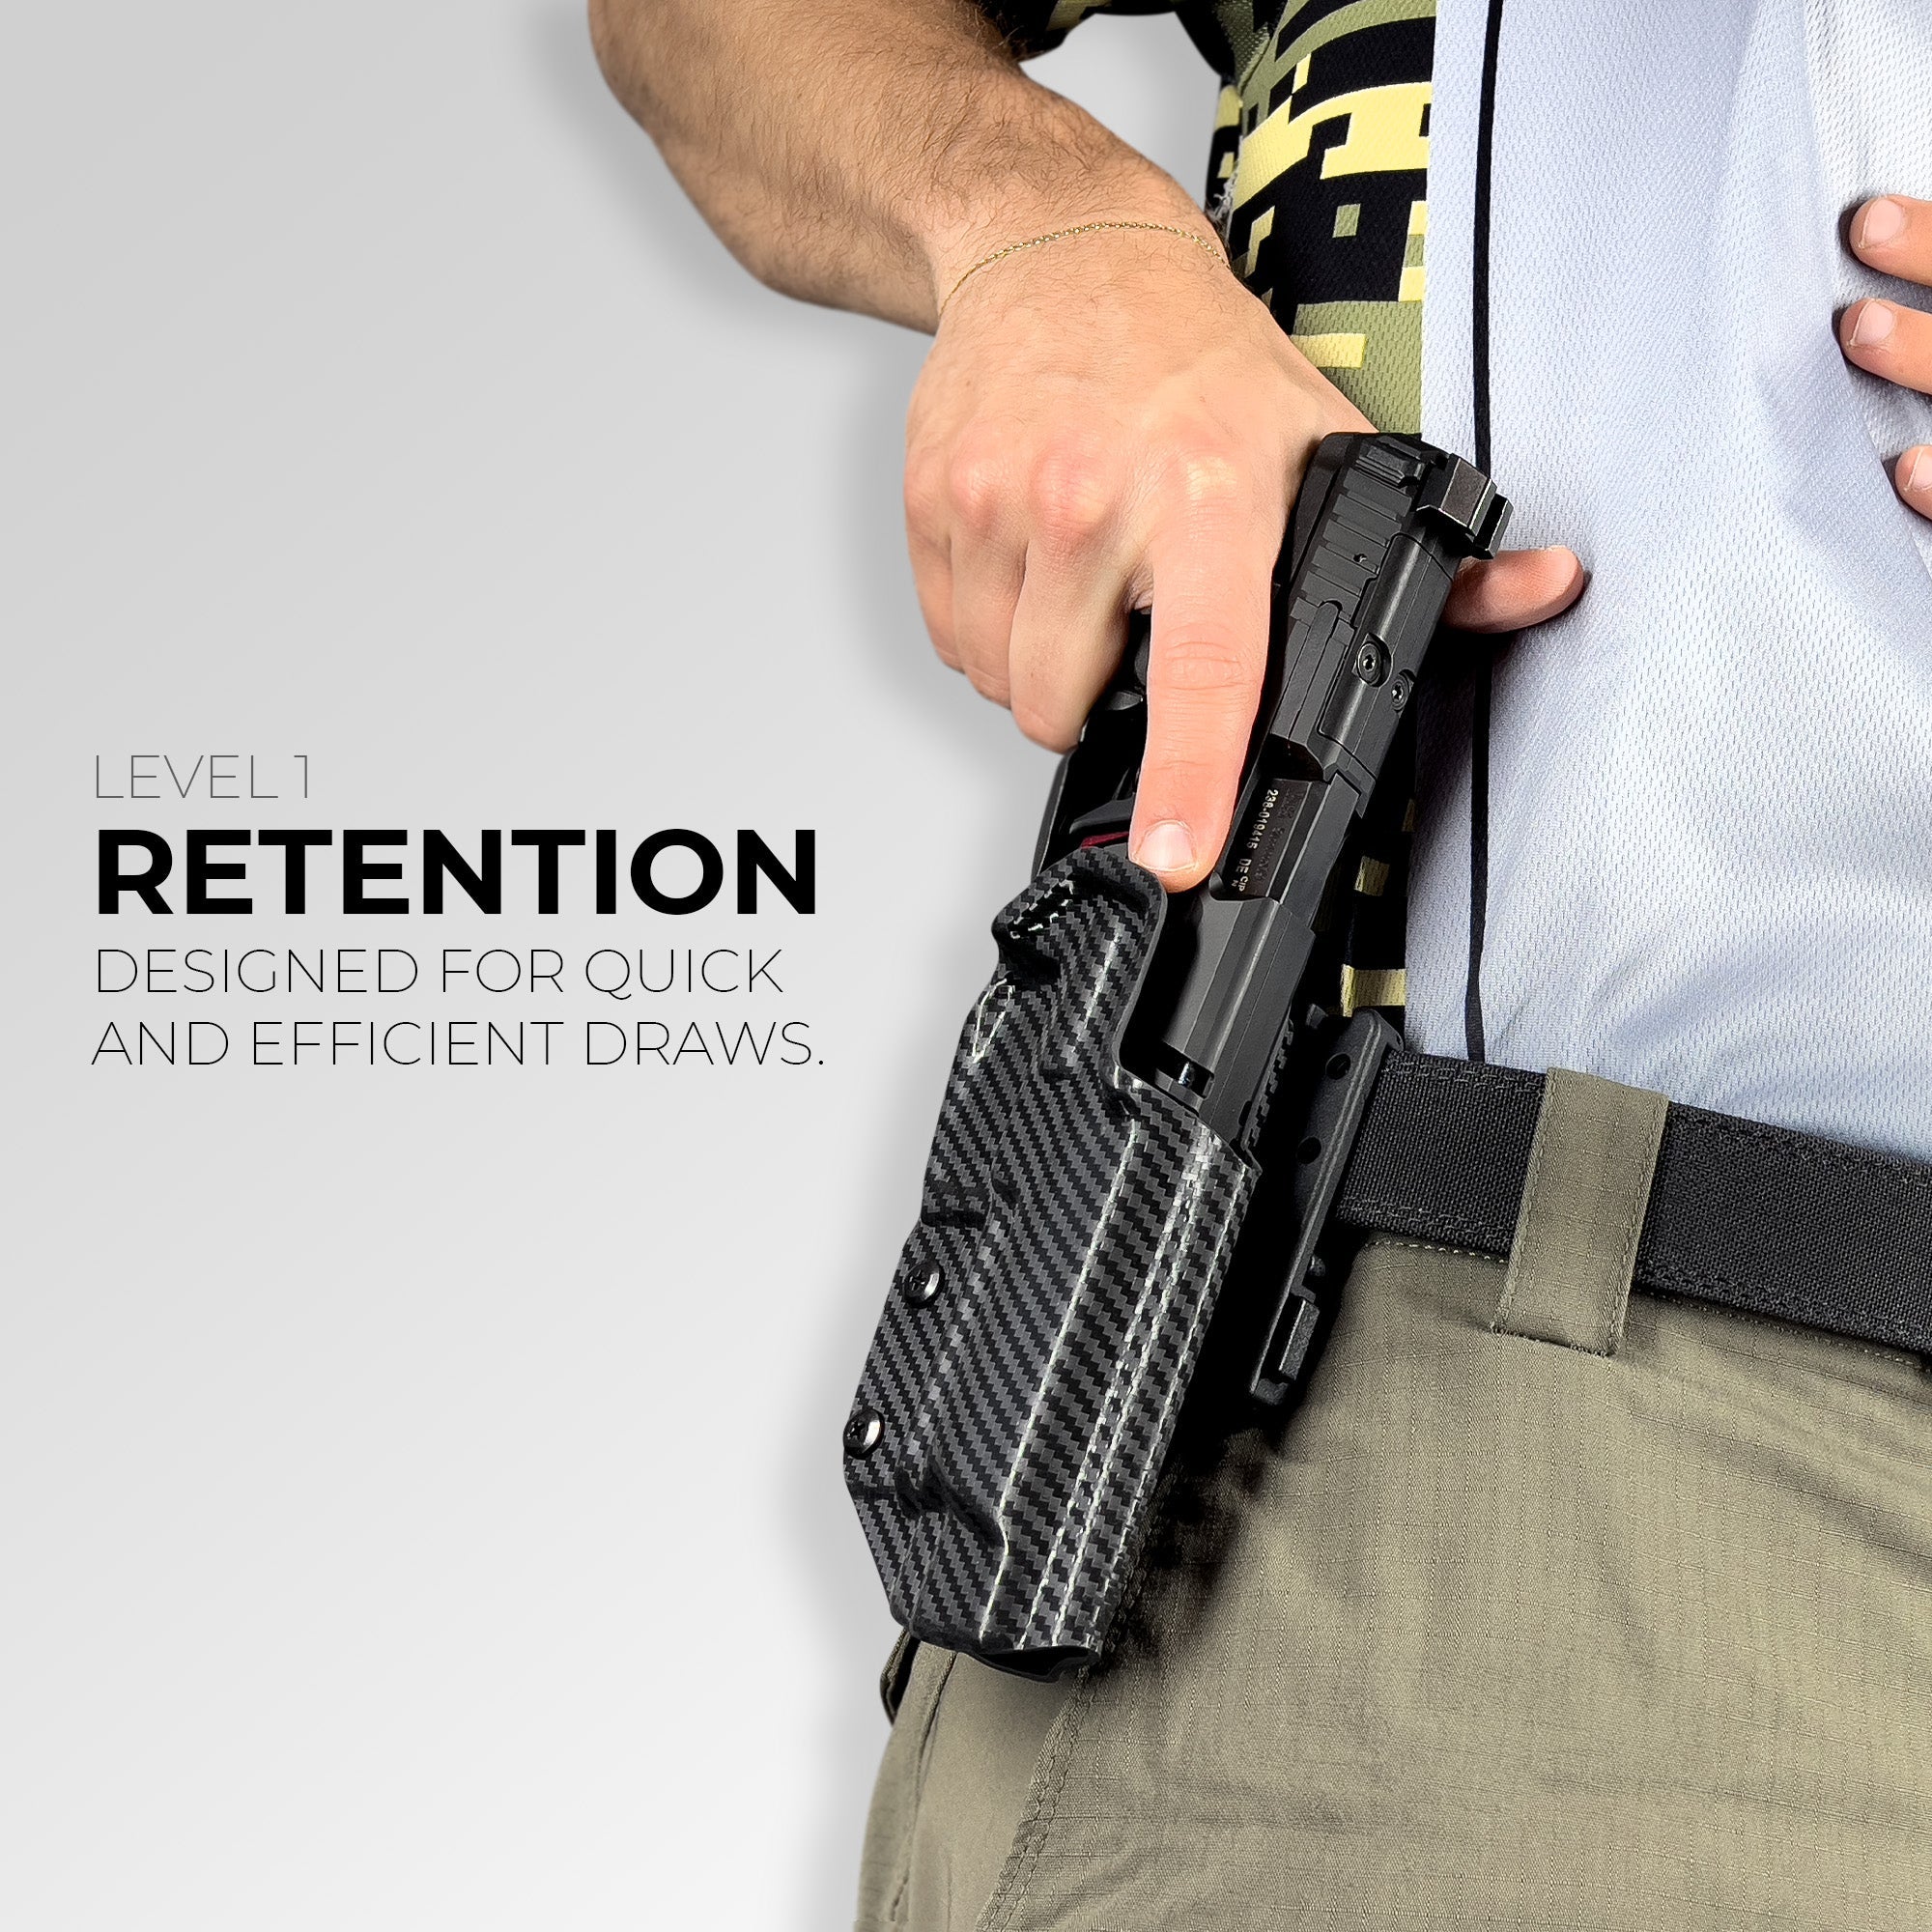
Kydex holsters dominate Production for good reason. They offer consistent retention, fast draws, and don't change shape over time. Brands like Safariland, Ghost, and Double Alpha make Production-specific models that maximize speed while staying within the rules.
Retention is the first consideration. You need enough to keep the gun secure during movement but not so much that it slows your draw. Adjustable retention is worth paying for—you can fine-tune it as you get faster.
The holster body should cover the trigger guard completely but not much more. Extra material just gets in the way. Look for smooth interior surfaces and a slight forward cant—usually 10-15 degrees. This helps the gun clear leather faster and positions the grip for a natural draw stroke.
Positioning the holster is where most new shooters go wrong. The temptation is to put it wherever feels comfortable standing still. That's not where you'll be shooting. You need to consider your draw stroke from awkward positions—kneeling behind cover, leaning around barriers, shooting on the move.
Start with the holster at 3 o'clock (9 o'clock for lefties) and adjust from there. Most shooters end up somewhere between 3 and 4 o'clock. The key is finding the spot where your draw stroke is consistent regardless of body position.
Height matters as much as position. The gun should sit high enough that you can get a full grip without changing your hand position, but not so high that it interferes with your arm movement. The top of the grip should be roughly level with your belt line.
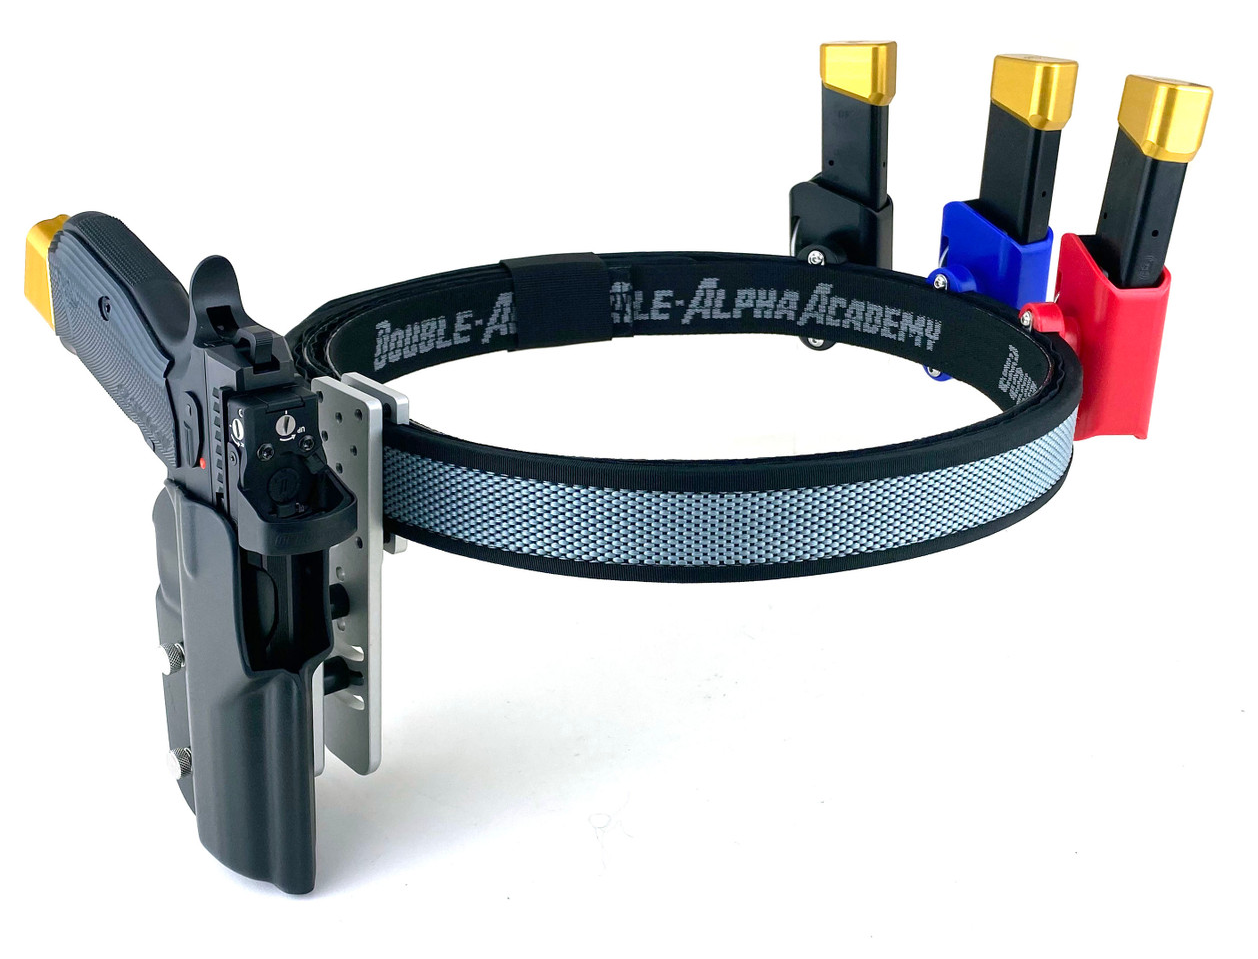
Magazine pouch selection and setup
Production rules allow up to four spare magazines, and you'll want all four. Stages can require 25-30 rounds, and having extra mags gives you options for stage planning.
Single-stack pouches are the standard for Production. Double-stack pouches exist but they're overkill when you're limited to four mags total. Single pouches also give you more flexibility in positioning.
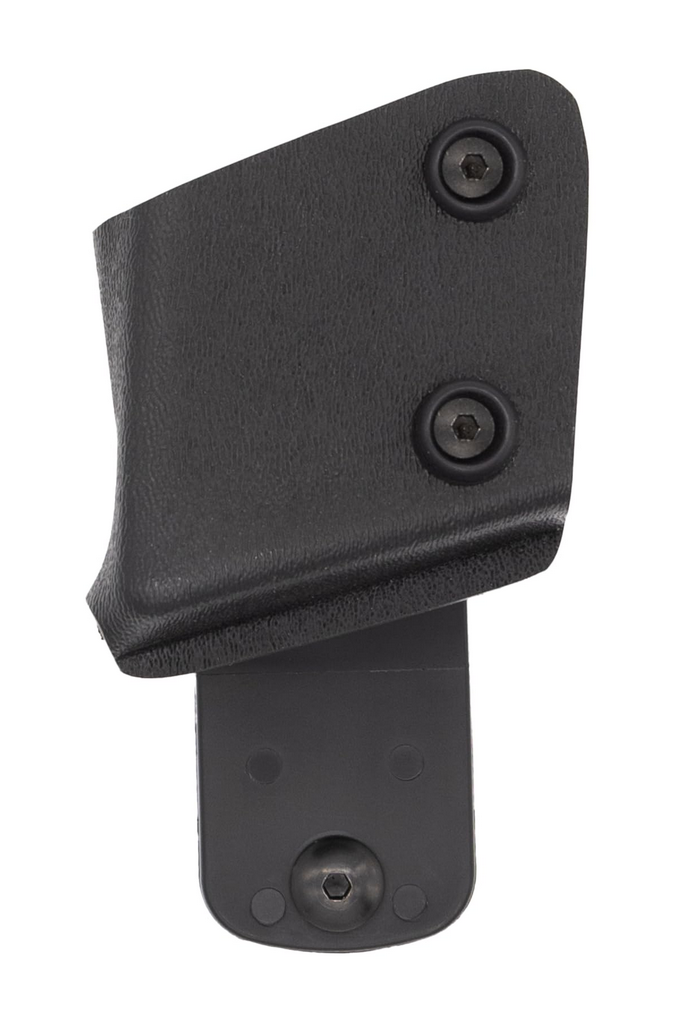
Retention systems vary widely. Spring-loaded pouches like the Safariland 773 series hold magazines securely but release cleanly with upward pressure. Friction-fit pouches rely on tight tolerances and material grip. Adjustable systems let you dial in exactly the retention you want.
The magazine should sit with about half an inch visible above the pouch. Too little, and you'll fumble for a grip. Too much, and the mag can bounce out during movement. The basepad should be easily accessible but the magazine body should be secure.
Range notes
I've watched guys spend five minutes adjusting magazine pouches between stages, trying to find the perfect position. Here's what actually works: set them up at home, then leave them alone. Your muscle memory needs consistency more than perfection.
Test your setup by running through complete reloads without looking down. If you can't find your magazines by feel alone, something needs to move. The pouches should be positioned so your hand naturally falls to them during your reload motion.
Pay attention to how the magazines sit after you insert them. They should be vertical, not canted. Canted magazines are harder to grab cleanly and more likely to hang up during the reload.
Positioning magazines behind the hip bone is a Production rule, but it's also good practice. This puts them in a natural position for your support hand during reloads. Most shooters end up with their first magazine around 8 o'clock (4 o'clock for lefties) and space the rest evenly from there.
The spacing between pouches depends on your hand size and reload technique. Most guys need about an inch between pouches to avoid grabbing the wrong magazine. Larger hands might need more space.
Consider your reload sequence when positioning magazines. If you always reload from the same pouch first, put that one in the most accessible position. If you vary your reload pattern based on stage requirements, space them evenly so they're all equally accessible.
Complete system integration
Getting each component right is only half the battle. The real challenge is making everything work together as a system. Your draw stroke, reload technique, and movement all have to flow naturally with your gear placement.
Start with your natural draw stroke and work backward. Draw your unloaded gun slowly and pay attention to the path your hand takes. Your holster should be positioned so this natural motion is as efficient as possible. Don't try to change your draw stroke to accommodate poorly positioned gear.
The same logic applies to reloads. Your support hand should be able to reach your magazines without changing your shooting stance significantly. If you have to twist or lean to reach a magazine, it's in the wrong place.
Movement is where many belt setups fall apart. Gear that works fine standing still can shift, bounce, or interfere with your stride when you're moving aggressively. Test your setup by running through movement drills. Everything should stay put without requiring constant adjustment.
Weight distribution affects both comfort and performance. A properly balanced belt should feel stable without being restrictive. If one side feels significantly heavier than the other, consider repositioning gear or adding a counterweight.
The belt should ride at the same height all the way around your waist. If it dips in back or rides high on the sides, you'll have consistency problems with your draw stroke. This is usually a sizing issue—the belt is either too loose or positioned incorrectly.
Common setup mistakes and fixes
The biggest mistake new Production shooters make is copying someone else's setup exactly. What works for a 6-foot-tall shooter with long arms won't work for someone who's 5'6" with a different body type. Use other setups as starting points, not templates.
Positioning gear too far back is epidemic among new competitors. It feels more comfortable and concealed, but it slows down your draw and reload times. Production isn't about concealment—it's about speed within the rules. Move everything forward until it feels slightly aggressive, then back off just a bit.
Over-tightening the belt is another common error. A tight belt feels more secure, but it restricts movement and becomes uncomfortable during long matches. You should be able to slide a finger between the belt and your body with moderate pressure.
Using too much retention on holsters and magazine pouches slows you down more than it helps. Start with minimal retention and increase it only if you're having retention problems. Most retention issues are actually positioning problems in disguise.
Neglecting the support-hand side of the belt is a mistake that shows up during reloads. Your support hand needs clear access to magazines without interference from other gear. Don't crowd the magazine pouches with accessories you don't actually need.
Inconsistent magazine insertion is usually a pouch problem, not a technique problem. If magazines don't sit the same way every time, the pouches are either worn out or poorly designed. Replace them before you develop bad habits trying to compensate.
Troubleshooting checklist
Draw feels awkward or slow: Check holster position and cant angle. Most problems are solved by moving the holster forward or adjusting the cant.
Magazines are hard to find during reloads: They're probably too far back or too close together. Move them forward and increase spacing.
Gear shifts during movement: Belt is too loose or gear isn't positioned over your center of gravity. Tighten the belt or redistribute weight.
Belt is uncomfortable after a few stages: Either too tight or positioned incorrectly on your waist. It should sit at your natural waistline, not your hips.
Magazines fall out of pouches: Retention is too loose, or the pouches are worn out. Adjust retention or replace the pouches.
Product recommendations
CR Speed belts remain the gold standard for many Production shooters. Their Super Hi-Torque model uses a rigid core with leather covering that breaks in to your body shape. The quality is excellent and they offer custom sizing. The downside is cost and break-in time—expect several weeks of regular wear before it feels natural.
Double Alpha Academy offers several Production-appropriate options. Their standard race belt is lighter than leather alternatives and requires no break-in. The DAA Ratchet Belt adds micro-adjustability, which is useful if your weight fluctuates or you compete in different climates. Both are well-made and widely used in competition.
For holsters, the Safariland ALS series works well in Production. The ALS mechanism provides excellent retention while still allowing fast draws. The 7378 model is specifically designed for competition use. Ghost holsters offer similar performance with different ergonomics—try both if possible.
Black Scorpion Gear makes solid magazine pouches at reasonable prices. Their Pro Competition pouches offer adjustable retention and work with most common pistol magazines. Safariland 773 series pouches are more expensive but offer superior build quality and longevity.
Ben Stoeger Pro Shop carries curated selections of Production-legal gear. Their recommendations tend to be solid, and they understand the specific requirements of Production Division. It's a good place to start if you're building your first competition setup.
Testing and refinement
Your initial setup is just a starting point. Plan on spending several range sessions fine-tuning positions and retention settings. Bring tools to make adjustments and don't be afraid to move things around.
Start with dry fire practice at home. Run through draw strokes and reloads slowly, paying attention to any binding or awkward movements. Fix obvious problems before you get to the range with live ammunition.
Live fire testing should focus on realistic scenarios. Practice draws from the holster, reloads under time pressure, and movement drills. Your gear should feel natural during all of these activities.
Keep notes on what works and what doesn't. Small changes in position can have big effects on performance, and it's easy to forget what you've tried. Document your setup with photos and measurements so you can replicate what works.
Don't make multiple changes at once. If you move your holster and adjust magazine pouch retention at the same time, you won't know which change caused any improvement or problems. Change one thing at a time and test thoroughly.
Most importantly, give changes time to work. Your muscle memory needs time to adapt to new gear positions. What feels awkward initially might feel natural after a few hundred repetitions. Don't abandon changes too quickly, but don't stick with something that clearly isn't working.
The goal is a belt setup that disappears during shooting. When everything is positioned correctly and adjusted properly, you shouldn't have to think about your gear. Your focus should be on targets and technique, not fighting with holsters and magazine pouches. That's when you know your Production belt setup is truly dialed in.