You've got a perfect shot lined up through a 4-inch gap in a concrete wall. Your target is 150 yards out, well within your zero. You squeeze the trigger and watch your round clip the bottom edge of the opening. The geometry just bit you.
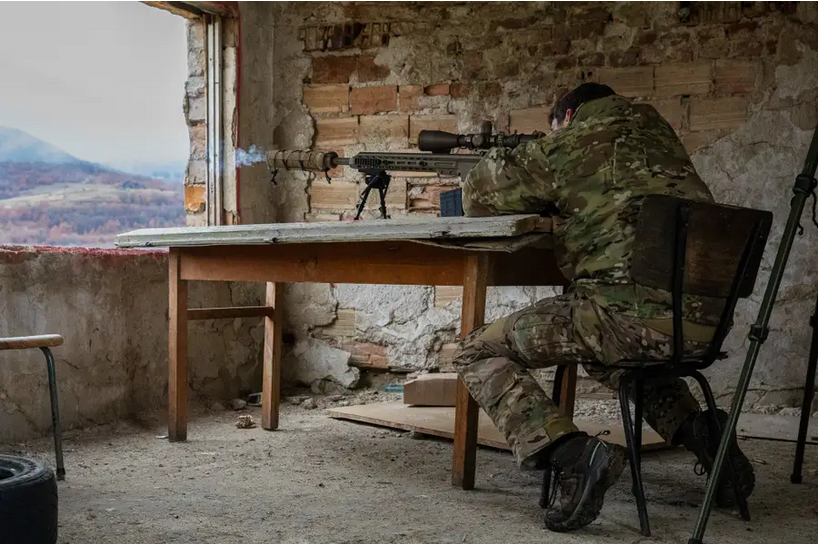
Most precision shooters never think about loophole calculations because they're shooting from open positions. But the moment you're forced to thread a bullet through a restricted opening — whether it's urban operations, hide construction, or even hunting from a blind — the relationship between your scope height, bullet trajectory, and that narrow window becomes critical. Miss the math, and you're either hitting concrete or giving away your position.
Here's what's happening: your scope sits roughly 1.5 to 2 inches above your bore centerline. At close range, your bullet is still climbing to meet your line of sight. That trajectory arc, combined with the vertical clearance of your loophole, creates a geometric puzzle that changes with every distance. Get it wrong, and precision doesn't matter.
The height-over-bore problem gets worse
Most military precision rifles run scopes mounted 1.5 to 2.2 inches above the bore centerline. With a 100-yard zero, your bullet starts about 1.5 inches low at the muzzle, crosses your line of sight around 25-30 yards, peaks about 1.5 inches high around 50-60 yards, then drops back to zero at 100.
That trajectory matters when you're shooting through a 6-inch window opening. At 50 yards, your scope might be perfectly centered on the opening, but your bullet path is actually 1.5 inches higher than your crosshairs indicate. In a 4-inch vertical clearance, that's the difference between a clean shot and concrete fragments in your face.
I've seen guys set up beautiful hide positions with perfect sight lines, only to discover their bullet path clips the opening edge at close range. The problem gets worse with higher scope mounts or shorter zeros. A 50-yard zero might keep your bullet closer to your line of sight, but it also means you're dealing with more drop at distance.
The geometry changes completely based on your shooting angle too. Shooting slightly downward through a loophole compresses your effective trajectory height. Shooting upward exaggerates it. A 10-degree downward angle can change your clearance requirements by half an inch or more at close range.
Calculating your clearance envelope
The basic loophole calculation starts with your height over bore measurement and your zero distance. You need to know exactly where your bullet path sits relative to your line of sight at every distance you might engage.
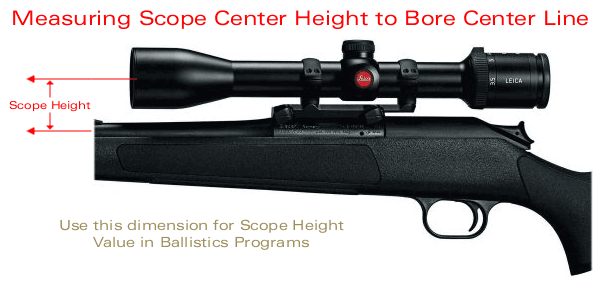
For a standard 1.8-inch height over bore with a 100-yard zero, your bullet is approximately 1.4 inches low at the muzzle, crosses line of sight at 27 yards, peaks at 1.4 inches high around 58 yards, and returns to zero at 100. These numbers change with different cartridges, but the pattern stays consistent.
Your minimum loophole clearance equals your height over bore plus your maximum trajectory height above line of sight. With that 1.8-inch scope height and 1.4-inch peak trajectory, you need at least 3.2 inches of vertical clearance for a clean shot anywhere from muzzle to 100 yards. That's assuming perfect centering in the opening.
But perfect centering is a fantasy. You need buffer space for natural point of aim variations, breathing, and the reality that your crosshairs won't stay perfectly centered during the shot sequence. Add another inch minimum for practical shooting. Now you're looking at 4.2 inches of required clearance for reliable shots through that opening.
The horizontal calculation is simpler but just as critical. Your scope's field of view at the loophole distance determines how much of the opening you can see and use. A 3-9x scope at 6x magnification gives you roughly 17 feet of field of view at 100 yards. At 25 yards, that's about 4 feet. If your loophole is only 8 inches wide and you're 25 yards behind it, you're looking at a severely restricted engagement area.
Range notes: measuring your actual trajectory
You can't just trust ballistic calculator outputs for loophole work. You need to verify your actual bullet path with your specific rifle, ammunition, and environmental conditions.
Set up a large cardboard backing at 50, 100, and 300 yards. Aim at a point 6 inches above the center of each target and fire one shot. Measure where your bullets actually hit relative to your aim point. This gives you your real trajectory curve, not the theoretical one.
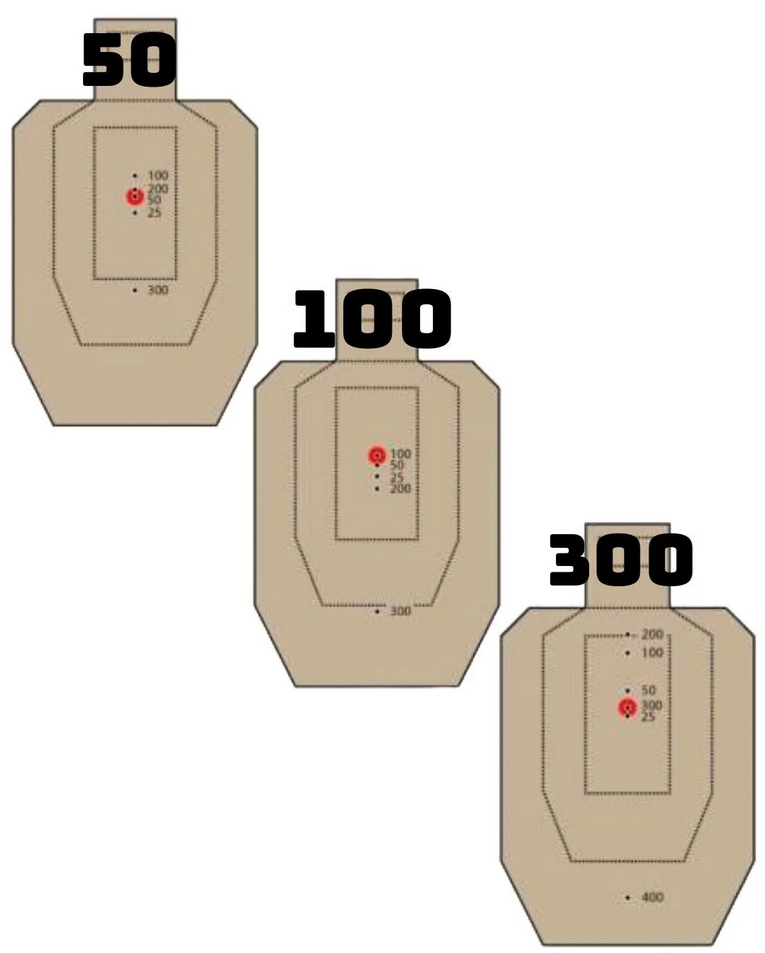
Do this with your actual combat ammunition, not match ammo. M118LR behaves differently than Federal Gold Medal Match, even in the same rifle. Temperature affects this too — your summer trajectory data might not match winter performance.
I've found that most guys' actual trajectories run about 0.2 to 0.4 inches different from calculator predictions. That might not sound like much, but in a 4-inch loophole, it's the difference between clearance and contact.
Document everything: temperature, humidity, altitude, and exact ammunition lot numbers. Your loophole calculations are only as good as your trajectory data, and that data changes with conditions.
Working the angles and distances
Loophole geometry gets complex when you factor in shooting angles and varying target distances. Your bullet path clearance requirements change based on both the angle to your loophole and the angle to your target.
Shooting through a loophole 20 yards away at a target 200 yards downrange creates a specific geometric relationship. Your line of sight passes straight through the opening to the target, but your bullet follows that curved trajectory path. The farther your target is beyond your zero distance, the more your bullet drops below your line of sight.
With a 100-yard zero engaging a target at 300 yards, your bullet drops roughly 19 inches below your line of sight. But here's the critical part: that drop is calculated from your scope position, not from the loophole. If you're shooting through an opening 30 yards away, your bullet is still climbing toward your line of sight at the loophole position.
The math gets messy, but the field solution is straightforward: establish your trajectory curve, then calculate where that curve intersects the plane of your loophole for any given target distance. Most guys use a simple field expedient — if your target is beyond your zero distance, aim at the bottom edge of the loophole opening. If it's inside your zero, aim higher in the opening.
Vertical angles complicate this further. Shooting downward compresses your effective trajectory because gravity affects your bullet path differently. The steeper the angle, the flatter your trajectory becomes. A 30-degree downward shot reduces your trajectory height by roughly 15%. That sounds helpful for loophole clearance, but it also means your drop calculations are off at distance.
Common mistakes that'll get you spotted
The biggest mistake is assuming your scope view represents your bullet path. Your crosshairs might be perfectly centered in that loophole, but your bullet could be tracking toward the bottom edge. I've watched guys set up in urban hides and spend hours perfecting their sight picture, only to send their first shot into concrete.
Another common error is ignoring the loophole's depth. A 12-inch thick wall creates a tunnel, not just an opening. Your bullet path has to clear the entire tunnel length, and the geometry changes as your shooting angle shifts. What looks like adequate clearance from directly behind the wall might not work from an offset position.
Guys also underestimate how much their natural point of aim shifts during extended observation periods. You might start with perfect loophole centering, but after 20 minutes of glassing, your position has shifted enough to put your bullet path in danger. Build in extra clearance margins and check your position regularly.
Temperature changes throughout the day affect both your trajectory and your equipment. Your scope mount might shift slightly as metal expands and contracts. Your ammunition performance changes with temperature. What worked during morning setup might not work for an afternoon engagement.
The worst mistake is not accounting for muzzle blast effects in confined spaces. That loophole that seemed perfect for bullet clearance might not handle the pressure wave and debris from your muzzle brake. You need clearance for the blast as well as the bullet, especially if you're shooting from inside a structure.
Field expedient solutions
When you don't have time for detailed calculations, there are proven field methods for loophole shooting. The most reliable is the "trace and verify" technique. Use a cleaning rod or straight stick to trace your actual bore line from muzzle to target. This shows you exactly where your bullet will travel, independent of your scope view.
Hold the rod against your muzzle and extend it toward your target. Where it intersects the loophole plane is where your bullet will pass. Compare this to where your crosshairs are pointing through the same opening. The difference is your height-over-bore offset at that distance.
For quick range estimation of loophole clearance, use the "thumb rule." At arm's length, your thumb width covers roughly 2 inches at 25 yards, 4 inches at 50 yards, and 8 inches at 100 yards. If your loophole looks wider than your thumb and you're 50 yards behind it, you've got about 4 inches of clearance to work with.
Another field method is the "two-point check." Pick two different aiming points in your loophole — top edge and bottom edge. Note where your crosshairs sit for each position. The difference between these positions, multiplied by your target distance and divided by your loophole distance, gives you your effective engagement window size.
For example, if you can move your crosshairs 4 inches vertically within the loophole at 30 yards, and your target is at 150 yards, your effective engagement window is 4 × (150/30) = 20 inches. That's how much vertical space you have to work with on your target while maintaining loophole clearance.
Equipment considerations for restricted shooting
Standard precision rifle setups aren't optimized for loophole work. Your scope height, stock configuration, and even your bipod choice affect how well you can work within geometric constraints.
Lower scope mounts reduce your height-over-bore measurement, which shrinks your required clearance envelope. A scope mounted 1.3 inches above bore instead of 1.8 inches gives you an extra half-inch of clearance margin. That might not sound like much, but in a 4-inch opening, it's significant.
Adjustable cheek pieces become critical when you're forced into awkward shooting positions to clear loophole geometry. You might need to shoot higher or lower than your normal head position to get proper sight alignment while maintaining bullet path clearance.
Bipod selection matters more than most guys realize. A bipod that doesn't allow enough height adjustment might force you into a shooting angle that puts your bullet path in conflict with your loophole clearance. Conversely, a bipod that gets too high might create an awkward shooting position that hurts your precision.
Muzzle devices need special consideration for loophole shooting. A large compensator or brake creates blast effects that require additional clearance. The pressure wave and debris can damage your hide or give away your position even if your bullet clears cleanly. Some guys switch to flash hiders or even remove muzzle devices entirely for urban operations.
Scope magnification affects your ability to see and use loophole openings effectively. Too much magnification and you can't see enough of the opening to judge your clearance margins. Too little and you can't precisely place your shots within the geometric constraints. Most experienced guys find 4-6x optimal for loophole work at typical urban engagement distances.
Match notes: practicing the geometry
You can't learn loophole shooting on the job. The geometry skills need to be developed through deliberate practice, and that means setting up training scenarios that replicate the real challenges.
Build training loopholes using cardboard or plywood with various opening sizes. Start with generous clearances — 8 to 10 inches — and work down to more restrictive openings as your skills improve. Practice from different distances behind the loophole: 10 yards, 25 yards, and 50 yards back from the opening.

Set up targets at multiple distances beyond your loophole to practice the changing geometry. A target at 75 yards requires different clearance calculations than one at 200 yards. Practice engaging targets at various distances without changing your loophole position.
Use different shooting positions and angles. Prone, sitting, kneeling, and improvised positions all change your relationship to the loophole geometry. Practice shooting slightly upward and downward through the same opening to understand how angles affect your clearance requirements.
Document your results. Keep track of which combinations of loophole size, shooting distance, and target distance work reliably. Note which ones are marginal and which ones don't work at all. This data becomes your reference for real-world applications.
Practice with different ammunition types if you have access. Your trajectory data for M118LR might not match your performance with Mk316 or other loads. Each combination of rifle and ammunition creates a slightly different trajectory curve.
Advanced calculations for complex scenarios
Real-world loophole shooting often involves more complex geometry than simple vertical clearance calculations. Multiple loopholes in sequence, angled walls, and moving targets all create additional mathematical challenges.
When shooting through multiple openings — like a window and a doorway in sequence — you need to calculate clearance for both restrictions. Your bullet path must clear both openings, and the geometry changes based on the spacing between them. The math involves calculating the bullet's position at each opening plane and ensuring adequate clearance at both points.
Angled loopholes, common in defensive positions, create asymmetric clearance requirements. A loophole cut at a 30-degree angle to your line of sight appears wider from your shooting position but actually provides less effective clearance. The bullet path intersects the angled opening at a different geometry than a perpendicular cut.
Wind affects loophole shooting more than most guys realize. A crosswind that pushes your bullet horizontally might not affect your hit probability on target, but it could push your bullet path into the edge of your loophole. Factor wind holds into your clearance calculations, especially for longer shots where wind drift becomes significant.
Moving targets create dynamic geometry problems. Your bullet path to intercept a moving target follows a different line than your static trajectory calculations. If that intercept path takes your bullet close to your loophole edges, you might not have adequate clearance even though your static calculations look good.
Building your loophole reference data
Every precision shooter needs a personalized reference for loophole calculations. This isn't something you can memorize from a manual — it has to be built from your specific equipment and verified through practice.
Start with your basic trajectory data: exact height over bore measurement, verified trajectory curve at 25-yard intervals out to your maximum engagement distance, and environmental factors that affect performance. This becomes your baseline for all loophole calculations.
Create a simple chart showing minimum loophole clearance requirements for different shooting scenarios. Include variables like shooting distance from loophole, target distance beyond loophole, and shooting angle. Most guys find a laminated card with this data invaluable for field reference.
Document the loophole sizes that work reliably with your equipment. A 6-inch opening might be adequate for targets beyond 100 yards but marginal for closer engagements. An 8-inch opening gives you comfortable margins for most scenarios. A 4-inch opening might only work for specific distance combinations.
Include notes about equipment modifications that improve loophole performance. Lower scope mounts, different bipod settings, or stock adjustments that help you work within geometric constraints. This information saves time when you're setting up in a real-world scenario.
Update your reference data whenever you change equipment or ammunition. A new scope mount height or different ammunition lot can change your calculations enough to matter in restrictive shooting scenarios.
What you'll see at distance
Loophole shooting skills transfer directly to other precision shooting challenges. The geometric thinking you develop for threading bullets through small openings applies to shooting around cover, through vegetation, and in any scenario where your bullet path is restricted.
Understanding the relationship between your line of sight and bullet path makes you a better shooter in all scenarios. You'll start noticing how shooting position affects your ability to clear obstacles. You'll become more aware of how environmental factors change your trajectory calculations.
The precision required for consistent loophole shooting improves your overall shooting fundamentals. When you have to place every shot within a narrow geometric envelope, your position, breathing, and trigger control all get better. There's no room for sloppy technique when concrete is inches away from your bullet path.
Most importantly, you'll develop the ability to quickly assess shooting scenarios and determine what's possible with your equipment. That skill set applies whether you're engaging targets through urban openings, around natural cover, or in any situation where geometry limits your options.
Start with generous clearances and work toward more restrictive scenarios as your skills improve. Master the basic calculations before you worry about complex angles and multiple restrictions. Build your reference data through deliberate practice, not guesswork. The geometry doesn't lie, but it also doesn't forgive mistakes.