Light primer strikes can be a real headache for semi-automatic handgun enthusiasts. You’re all set for a day at the range, but your trusted sidearm suddenly decides to play coy with the primer. The round goes click instead of bang, and you're left scratching your head. This article will dive deep into diagnosing light primer strikes in semi-automatic handguns, focusing on common causes and fixes you can tackle at your workbench.
Scope and safety boundaries
First off, let's set some ground rules. We’re here to discuss user-serviceable issues. You, the home armorer, can safely diagnose and fix some common causes of light primer strikes. However, if you find yourself needing to replace major components like the firing pin or hammer, it’s time to call in a qualified gunsmith. Remember, we're not going to bypass safety devices or modify anything in a way that could make your firearm less reliable or safe.
Now, let's get to it.
Bench safety checklist
Before diving into diagnosis, it’s crucial to ensure that your workspace is safe and organized. Here’s a quick checklist to keep you on track:
Check that your firearm is unloaded. Always inspect the chamber and magazine.
Wear appropriate PPE. Safety glasses and hearing protection are a must, especially when working on firearms.
Have your tools ready. Gather essential items like a bench block, roll-pin punches, a torque wrench, and feeler gauges.
Work in a well-lit area. Good lighting helps you see the details that matter.
Keep your parts organized. Use labeled bags or a tray to prevent losing small pieces.
Have the factory manual handy. This will be your roadmap for parts and specifications.
Bench and tools
Setting up your bench for diagnosing light primer strikes should be straightforward. You don’t need a fancy setup; just a clean, well-lit space with the right tools. Here’s a list of essentials to keep close at hand:
Bench block: This will support your frame while disassembling components.
Roll-pin punches: These are great for removing pins without damaging your frame.
Torque wrench: To ensure that any screws or bolts are tightened to the manufacturer’s specs.
Feeler gauges: Useful for checking tolerances, especially if you suspect issues with the firing pin or hammer engagement.
Cleaning supplies: A good cleaning kit will help you inspect parts for fouling or wear.
Diagnosis before teardown
Before jumping into disassembly, you need to perform some basic diagnostics to narrow down the potential causes of light primer strikes. Here are some common symptoms and what they might mean:
Inconsistent ignition: If only certain rounds fail to fire, it could point to ammunition issues rather than a problem with the firearm.
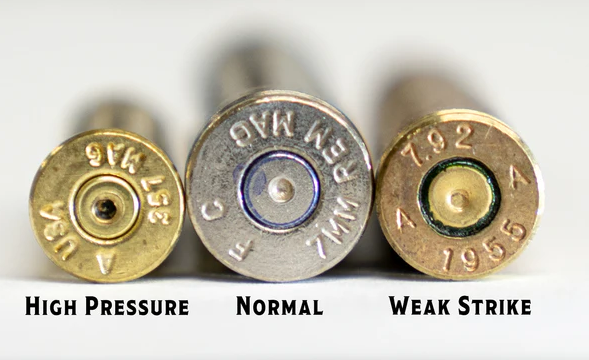
Firing pin strike marks: Inspect the primers of fired rounds. A faint dent may indicate a weak strike.
Trigger pull weight: If the trigger feels unusually heavy or gritty, it could affect the firing pin's engagement.
Firing pin movement: Check for any binding or excessive play in the firing pin channel.
Take your time and document your findings as you go. This will help you keep track of any changes you make later on.
Controlled disassembly and inspection
Once you have a clear picture of the symptoms, it’s time to disassemble your firearm for a closer inspection. Follow these steps:
Step 1: Disassemble the handgun
Ensure your workspace is clear. Remove the slide, recoil spring, and barrel according to the manufacturer’s instructions. Lay out the parts in order to maintain organization.
Step 2: Inspect the firing pin
With the slide removed, take a good look at the firing pin. Check for the following:
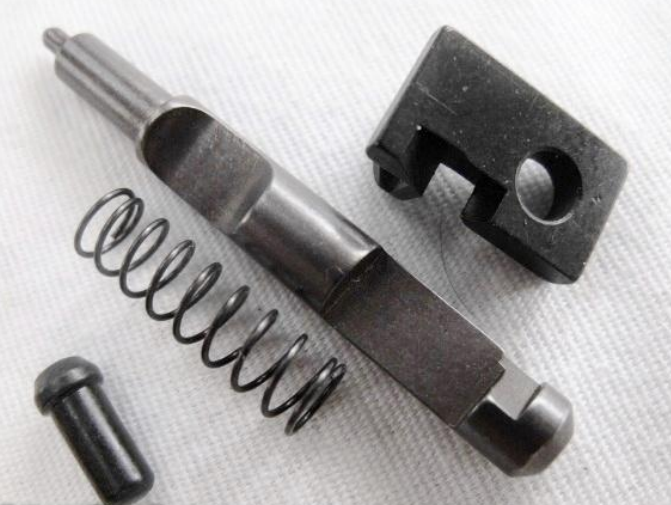
Wear or damage: Look for any nicks or burrs on the firing pin that could impede its movement.
Free movement: Make sure the firing pin moves freely within its channel. If it feels sticky, clean the channel with a solvent and a brush.
Spring tension: Check the firing pin spring for fatigue or damage. A weak spring can lead to insufficient force during ignition.
Step 3: Examine the hammer
Next, inspect the hammer assembly. Pay attention to:
Hammer engagement: Make sure the hammer is engaging the firing pin properly. Look for any signs of wear on the contact surfaces.
Spring condition: Just like the firing pin, the hammer spring should be strong and free of corrosion.
Trigger linkage: Ensure that the hammer is being fully cocked by the trigger mechanism. Sometimes, a worn sear can prevent the hammer from falling with enough force.
Step 4: Inspect the trigger
While you’re at it, check the trigger assembly for any potential issues:
Weight of pull: Use a scale to measure the trigger pull weight. If it’s heavier than the manufacturer’s specs, it could affect firing pin engagement.
Smoothness: Check for any binding or rough spots that might impede the trigger’s function.
Step 5: Check the ammunition
If your firearm seems to be functioning well mechanically, it’s time to consider the ammo. Here’s what to look for:
Primer type: Ensure you’re using primers suited for your specific firearm. Some handguns prefer specific primer types, like soft or hard.
Reloaded ammunition: If you’re using reloaded rounds, inspect them closely. Poorly sized cases or inconsistent powder loads can lead to light strikes.
Age of ammunition: Old or improperly stored ammo can have degraded primers, leading to misfires.
Common causes and fixes
With your firearm disassembled and inspected, let’s dive into some common causes of light primer strikes and the corresponding fixes.

Cause 1: Weak firing pin spring
A weak firing pin spring is one of the most common culprits. If the spring is worn or damaged, it may not provide sufficient force to strike the primer effectively.
Fix: Replace the firing pin spring with a factory-spec part. This is a straightforward swap that can significantly improve reliability.
Cause 2: Dirty firing pin channel
A dirty firing pin channel can impede movement, leading to inconsistent strikes. Fouling can build up from the firing process, especially with certain ammunition types.
Fix: Clean the firing pin channel thoroughly using a solvent and a brush. Make sure to remove any debris or fouling that could hinder movement.
Cause 3: Hammer engagement issues
Improper hammer engagement can prevent the firing pin from being struck with enough force. This could be due to wear on the sear or improper assembly.
Fix: Inspect the sear and hammer for wear. If they appear worn, consider replacing them. Ensure proper assembly and that all parts move freely.
Cause 4: Heavy trigger pull
A trigger pull that exceeds factory specifications can affect the entire firing process. If it’s too heavy, it may not fully release the hammer.
Fix: Adjust the trigger pull to meet manufacturer specifications. This might involve replacing parts or adjusting the trigger mechanism.
Cause 5: Poor ammunition
Lastly, don’t overlook the ammunition. If you’re using rounds that don’t match your firearm’s needs, you’ll run into problems.
Fix: Use high-quality factory ammunition with the right primer type for your firearm. Avoid using old or questionable reloaded rounds.
Bench note
When inspecting the firing pin, pay close attention to the condition of the firing pin channel. A small burr or piece of debris can make a world of difference in performance. If you feel resistance while moving the firing pin, stop and investigate further before reassembly.
Reassembly and function checks
Once you’ve addressed any issues, it’s time to reassemble your firearm. Follow these steps carefully:

Breakthrough Clean Solvent Deals
Prices may change. May contain affiliate links.
Reassemble the slide: Start with the barrel and recoil spring, then attach the slide back onto the frame.
Function check: Before heading to the range, perform a function check. Ensure the trigger engages and resets smoothly.
Dry fire: With the firearm pointed in a safe direction, dry fire the gun a few times to ensure the firing pin strikes the dummy round (if available) firmly.
Live fire verification: Finally, take it to the range. Fire a few rounds to confirm that the issues are resolved.
Long-term maintenance habits
To keep your semi-automatic handgun running smoothly, develop good maintenance habits:

Regular cleaning: Clean your firearm after every use to prevent fouling build-up.
Routine inspections: Check your firing pin, hammer, and trigger mechanism periodically, especially after a high round count.
Keep records: Document any repairs or adjustments you make. This will help you track any recurring issues over time.
Common mistakes
As you work through diagnosing light primer strikes, here are some common pitfalls to avoid:
Ignoring the ammunition: Always check your ammo first. It’s an easy fix that can save you time and effort.
Neglecting cleanliness: A dirty firing pin channel can lead to repeated issues. Keep it clean!
Overlooking the factory specs: Always refer back to the manufacturer’s specifications for parts and adjustments.
Skipping function checks: Don’t assume everything is fine after reassembly. Always perform function checks before live firing.
With careful diagnosis and some practical fixes, you can keep your semi-automatic handgun running smoothly and reliably. Remember, methodical work and proper documentation go a long way in ensuring your firearm’s performance.